If your Samsung A51 repair solution, you are not alone. This is one of the most common hardware issues reported by Samsung users. In this repair guide, we will show you exactly how to fix the samsung a51 repair solution using a step-by-step method that has been tested and verified. Watch the full video tutorial below and follow the written steps carefully.
SamsungA51 #ChargingPortRepair #MobileRepairing #SamsungA51Fix #SubBoardReplacement #MicRepair #TechSolution
Does your Samsung A51 have charging issues, a faulty microphone, or no sound from the ringer? This professional step-by-step guide shows you how to replace the sub-board to restore all functions instantly.
If your device is not charging or the speaker and mic are failing, a faulty sub-board is often the culprit. This technical repair tutorial covers Samsung A51 charging port replacement, microphone troubleshooting, and ringer repair for technicians and DIY enthusiasts globally.
Hardware Repair Highlights:
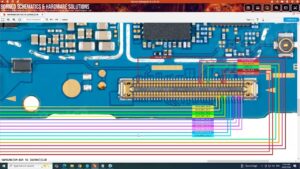
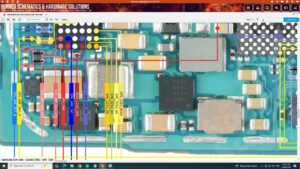
Samsung A51 Sub Board Replacement
Charging Logic Board Jumper Solution
Mic and Speaker PCB Troubleshooting
USB Type-C Port Repair & Maintenance
Motherboard to Sub-Board Flex Connection Check
This video is designed for professional technicians in the USA, UK, Canada, and Australia looking for high-quality Samsung Galaxy A-series repair solutions
Samsung A51 sub board replacement, Samsung A51 charging port repair, Samsung A51 mic not working, Samsung A51 ringer fix, Samsung A51 speaker solution, Samsung A51 charging pause solution, Samsung A51 logic board repair, how to fix Samsung A51 charging, Samsung A51 sub pcb, Samsung A51 audio problem, mobile repairing course, Sanyo Mobile repair
How to Fix Samsung A51 repair solution — Step-by-Step Guide
- Power off the Samsung A51 device completely.
- Perform a soft reset: hold Power + Volume Down for 10 seconds.
- Back up your data before attempting any repair.
- Open the device carefully using a heat gun and plastic pry tool.
- Inspect internal components for visible damage, corrosion, or loose connectors.
- Re-seat all flex cables and ribbon connectors.
- Test individual components using a multimeter.
- Replace faulty components with genuine spare parts.
- Reassemble the device and test all functions before final closure.
Tools You May Need
- Screwdriver set (Phillips & Pentalobe)
- Plastic pry tool / spudger
- Tweezers
- Multimeter (for advanced diagnosis)
- Soldering iron (if board-level repair is needed)
Important Tips Before You Start
- Always power off the device before opening it.
- Take photos before disconnecting any cables so you remember where each connector goes.
- Work on a clean, well-lit surface to avoid losing small screws.
- If the phone is under warranty, contact Samsung service centre first.
Final Words
We hope this guide helped you solve the samsung a51 repair solution problem. If the issue persists after following all the steps, the problem may require a board-level repair or component replacement. Visit a professional mobile repair technician in that case. For more repair guides like this, browse our full repair library or subscribe to our YouTube channel for daily video tutorials.